


 Let’s Taco ’Bout Comfort Food (The Keto Way!)
Hey friend! Madison here, your fellow flavor-chaser and keto kitchen confidante. Ever have one of those days where you’re dreaming of crispy taco shells piled high with all the fixings, but that little keto voice whispers, “Nuh-uh, those carbs ain’t worth it”? Yeah, me too. Like, way too often. That’s exactly why this Cheesy Keto Taco Casserole is my ultimate kitchen hug—a big, bubbling dish of everything you crave, minus the carb crash. Picture this: savory seasoned beef, vibrant veggies dancing in spices, and a blanket of melty Mexican cheese that’s practically singing “olé!” from the oven. It’s the cozy, no-fuss dinner hero your weeknights desperately need, whether you’re feeding a hungry family, meal-prepping like a boss, or just treating yourself after a long day. Forget sad diet food; this is pure, unapologetic joy on a plate. No complicated steps, no weird ingredients—just real, delicious food that fits your low-carb life. So, grab your skillet and your cheesiest grin… we’re about to make magic!
Taco Tuesdays & Grandma’s Casserole Wisdom
This recipe? It’s got heart. It takes me straight back to my grandma’s chaotic, laughter-filled kitchen. Every Sunday, she’d whip up a giant casserole—her “clean-out-the-fridge special.” It was never fancy, but man, was it loved. Fast forward to my early keto days, drowning in egg fatigue. I was missing those big, communal meals desperately. One Tuesday, taco cravings hit hard. I stared at ground beef, a wilting zucchini, and half a bell pepper. Channeling my inner Grandma (“Waste not, want not, honey!”), I tossed it all together with spices and cheese, crossed my fingers… and bam! The first bite? Pure nostalgia meets keto victory. That messy experiment became this casserole. It’s not just dinner; it’s a reminder that keto isn’t about restriction—it’s about reinventing comfort, one cheesy, joyful layer at a time. Grandma would’ve approved (and probably asked for seconds!).
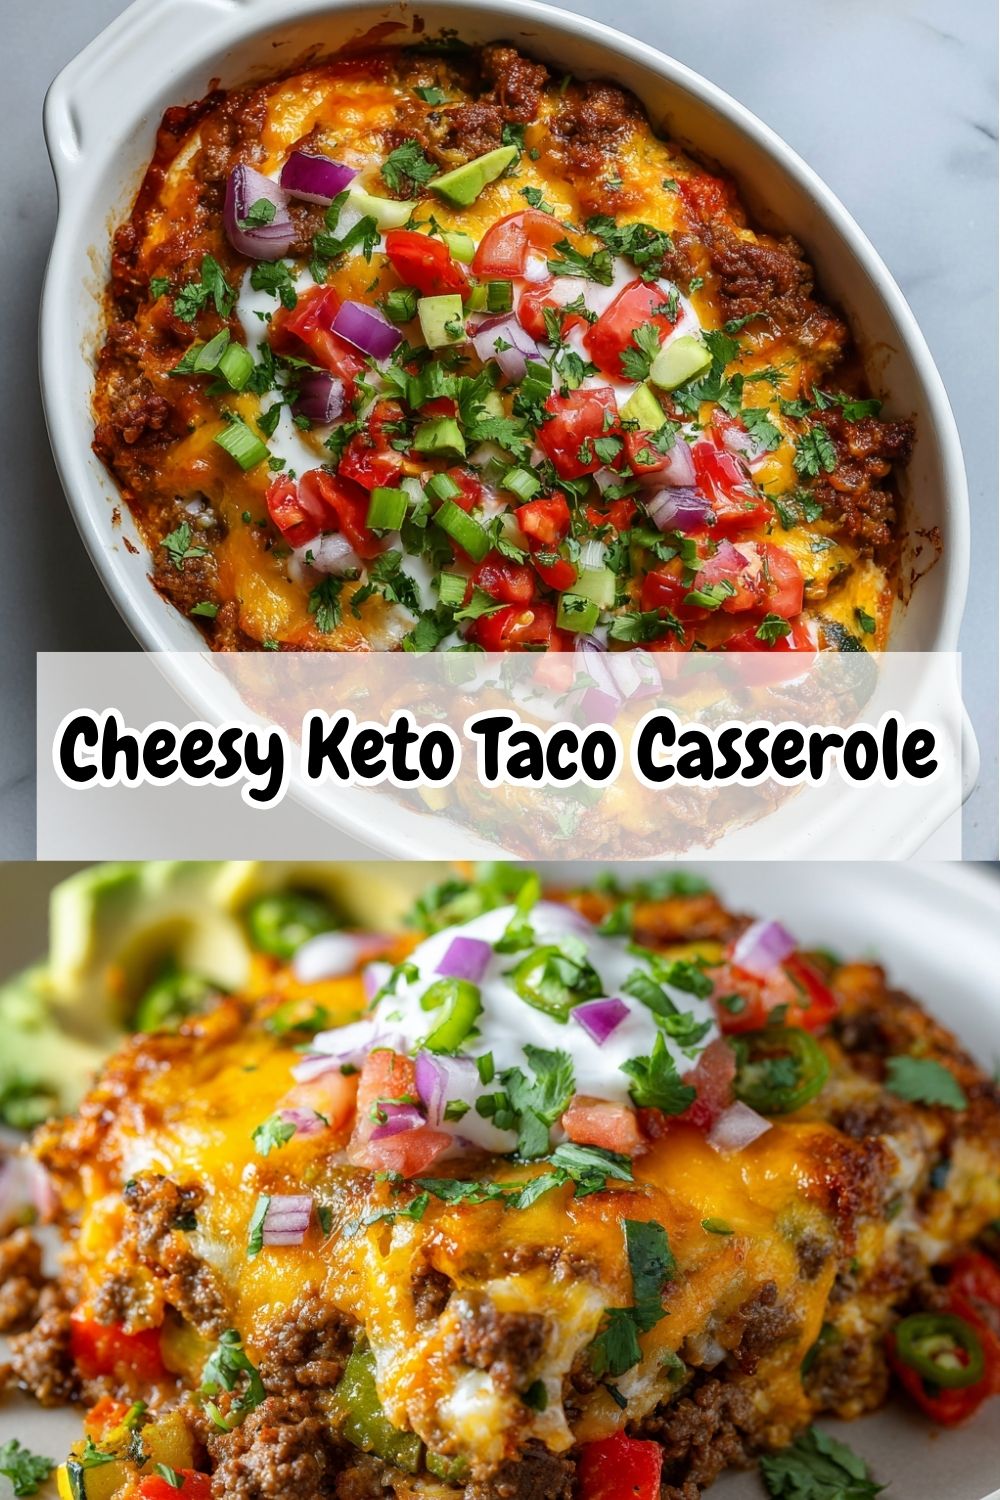
PrintCheesy Keto Taco Casserole

This Cheesy Keto Taco Casserole is a fiesta in a dish—loaded with seasoned beef, fresh veggies, and bubbly cheese. It’s a one-pan wonder that keeps the carbs low and the flavor high. Perfect for meal prep or a fuss-free dinner the whole family will love!
- Prep Time: 8 min
- Cook Time: 30 min
- Total Time: ~38 min
- Yield: 6 servings 1x
- Category: dinner
Ingredients
16 oz grass-fed ground beef or 4 crumbled beef patties
½ yellow onion, diced
1 red bell pepper, diced
1 cup zucchini, sliced
1 cup uncooked cauliflower rice
2 tsp avocado oil
1–2 cups red salsa of choice
1 jalapeño, seeded and chopped
1 tbsp oregano
1 tsp cumin
3–4 tbsp taco seasoning
¼ cup beef or chicken stock
2 cups shredded Mexican cheese
For Serving:
½ cup chopped cilantro
1 cup sour cream
1 cup salsa
Instructions
Preheat oven to 375°F (190°C).
In a large skillet, heat avocado oil. Add onion, bell pepper, zucchini, and jalapeño. Sauté 3–4 minutes.
Add ground beef and cook until browned. Drain excess fat.
Stir in cauliflower rice, taco seasoning, oregano, cumin, salsa, and stock. Simmer for 5 minutes.
Transfer mixture to a greased baking dish. Top with shredded cheese.
Bake uncovered for 20–25 minutes, or until bubbly and golden.
Garnish with cilantro and serve with sour cream and extra salsa.
Nutrition
- Calories: 420
- Fat: 30g
- Carbohydrates: 7g
- Protein: 28g
Your Fiesta-In-A-Pan Shopping List
Gather these simple, flavor-packed players! Don’t stress about perfection—this dish is wildly flexible. Swap, skip, or substitute based on what’s in your fridge or pantry. That’s the beauty of a casserole!
- 16 oz grass-fed ground beef (or 4 crumbled beef patties): Grass-fed packs more flavor and nutrients, but regular works great too! Using pre-cooked patties? Genius hack for leftover burgers! Just crumble ’em in.
- ½ yellow onion, diced: Sweet, savory base magic. No yellow? White or red onion steps right up.
- 1 red bell pepper, diced: Color, crunch, and a hint of sweetness! Green bell pepper works if it’s all you have, but red/yellow/orange are sweeter.
- 1 cup zucchini, sliced: Adds moisture and sneaks in a veggie boost! Yellow squash is a perfect twin here.
- 1 cup uncooked cauliflower rice: Our low-carb “rice” superstar! No need to cook it first—it softens perfectly while baking. Grab frozen for ease!
- 2 tsp avocado oil: My high-smoke-point fave for sautéing. Olive oil or butter? Also delicious!
- 1–2 cups red salsa of choice: This is your flavor engine! Use mild, medium, or hot—your taste buds rule. Need sugar-free? Check labels carefully! About 1 cup keeps it thick, 2 cups makes it saucier.
- 1 jalapeño, seeded and chopped: For a gentle kick! Seed it for mild, leave some seeds if you like heat. No jalapeño? A pinch of red pepper flakes works.
- 1 tbsp oregano: Earthy depth. Mexican oregano is ideal if you have it (slightly citrusy!), but regular dried oregano is A-OK.
- 1 tsp cumin: That warm, smoky taco soul. Non-negotiable for me!
- 3–4 tbsp taco seasoning: Homemade or store-bought—your call! Start with 3 tbsp, taste after simmering, add more if you want bolder flavor.
- ¼ cup beef or chicken stock: Keeps everything juicy and helps meld the flavors. Bone broth adds extra goodness! Water works in a pinch.
- 2 cups shredded Mexican cheese blend: The glorious, melty crown! Pre-shredded is fine (look for no added starches), but shredding your own melts dreamier. A cheddar/jack blend is perfect.
- For Serving: ½ cup chopped cilantro, 1 cup sour cream, 1 cup salsa: The fresh, cool finish! Don’t skip the cilantro—it brightens everything. Sour cream adds creamy richness, extra salsa brings more zing.
Let’s Build Your Flavor Fiesta!
Ready? This is where the fun happens! Grab your favorite big skillet and a trusty baking dish (I use a 9×13 inch). Let’s cook with joy—and maybe dance a little salsa while we’re at it.
- Preheat & Prep: Fire up that oven to 375°F (190°C)! (Chef Hack: While it heats, chop all your veggies—onion, bell pepper, zucchini, jalapeño—so they’re ready to roll. Multitasking win!) Lightly grease your baking dish. No fancy spray? A dab of oil on a paper towel works.
- Sizzle Those Veggies: Heat the avocado oil in your large skillet over medium-high heat. Toss in the onion, bell pepper, zucchini, and jalapeño. Sauté for 3-4 minutes, stirring occasionally, just until they start to soften and smell amazing. (Tip: Don’t overcook here! We want some texture left—they’ll soften more later.)
- Brown the Beef: Push the veggies to the side of the skillet. Add the ground beef, breaking it up with your spoon or spatula. Cook until nicely browned, about 5-7 minutes. (Key Step: Drain any excess fat now! Less greasy = better texture. Tilt the skillet, spoon it out, or use a fat separator.)
- Spice It Up & Simmer: Now, the flavor party! Stir in the uncooked cauliflower rice, taco seasoning, oregano, cumin, salsa, and stock. Mix everything beautifully. Bring it to a gentle simmer (little bubbles around the edges). Let it cook for 5 minutes, stirring occasionally. (Chef Insight: This simmer is crucial! It wakes up the spices, softens the cauli rice slightly, and lets the flavors marry. Taste it! Need more salt? More kick? Adjust now.)
- Cheese Time! Bake to Bubbly Bliss: Pour the glorious, fragrant mixture into your greased baking dish. Spread it evenly. Now, shower it lovingly with ALL that shredded cheese. Be generous! (Fun Fact: I firmly believe extra cheese = extra joy. No one ever complained about too much cheese!) Pop it in the oven, uncovered, for 20-25 minutes. You’re waiting for that cheese to be melted, golden, and bubbly, and the edges to be happily sizzling.
- Garnish & Serve: Carefully remove your masterpiece from the oven (it’s lava-hot!). Let it sit for 5 minutes—this helps it set, making serving easier. Scatter the fresh cilantro over the top like confetti. Serve it up hot, with big dollops of cool sour cream and extra salsa on the side. (Serving Tip: Let everyone scoop their own portion—it’s fun and casual!)
Dishing Up the Deliciousness
This casserole is a star all on its own! I love serving it family-style, right in the baking dish placed on a trivet in the middle of the table—it’s inviting and sparks conversation. Scoop generous portions into shallow bowls (they hold the goodness better than plates!). The fresh cilantro is non-negotiable for that pop of color and bright flavor. Offer the sour cream and extra salsa in cute little bowls on the side so everyone can customize their bite. Feeling fancy? A quick side of crisp romaine lettuce leaves or crunchy cucumber slices adds a refreshing crunch. It’s hearty enough to stand alone, but a simple green salad with a lime vinaigrette is always a winner too. Comfort food, served with zero fuss and maximum smiles!
Make It Your Own! Flavor Twists & Swaps
This recipe is your canvas! Get creative and adapt it to your cravings or what’s in the fridge:
- Chicken Fiesta: Swap the ground beef for ground chicken or turkey! It’s lighter but just as tasty. Use chicken stock for the liquid.
- Spicy Chorizo Kick: Replace half the beef with cooked, crumbled Mexican chorizo (check for sugar-free!). Hello, smoky heat!
- Veggie-Packed Power: Add 1 cup of chopped mushrooms or spinach with the zucchini. Or stir in a drained can of black soybeans (low-carb bean sub!) at the end of simmering for extra protein/fiber.
- “Taco Salad” Style: Skip the baking! After step 4, just melt the cheese into the hot skillet mixture. Serve it warm over a big bed of crisp lettuce, topped with the cilantro, sour cream, salsa, maybe some diced avocado or pork rinds for crunch.
- Dairy-Free Delight: Omit the cheese topping or use your favorite dairy-free shreds. Swap the sour cream for avocado crema (blend avocado + lime juice + salt) or coconut cream.
Madison’s Kitchen Confessions & Tips
Oh, this casserole has seen some things! Early versions? Let’s just say I once forgot to drain the beef fat… resulting in a slightly greasy, albeit still delicious, puddle. Lesson learned! Over time, I realized the magic of the simmer step – don’t rush it! Letting those spices mingle with the salsa and stock builds incredible depth. I also started using uncooked cauliflower rice directly – total game-changer for simplicity and texture. It absorbs all the flavors beautifully without getting mushy. One hilarious fail involved accidentally using cinnamon instead of cumin (yikes!). Now, I always double-check my spice jars! The best part? This dish gets even BETTER as leftovers. The flavors meld overnight in the fridge, making it my secret weapon for epic next-day lunches. Feel free to double the recipe for a crowd or mega meal prep – it freezes like a dream!
Your Taco Casserole Questions, Answered!
Let’s tackle those common kitchen curiosities:
- Q: My casserole turned out watery! What happened?
A: Ah, the dreaded sogginess! The main culprits are usually: 1) Not draining enough fat from the beef. Fat separates and pools. Drain well! 2) Using salsa with high water content (check for thick, chunky styles) or adding too much (stick closer to 1 cup if this happens often). 3) Veggies (especially zucchini) releasing extra moisture. Sautéing them first helps evaporate some liquid. 4) Not simmering the mixture long enough before baking – that 5 minutes helps reduce excess liquid. If it happens, pop it back in the oven for 5-10 extra minutes uncovered. - Q: Can I make this ahead of time?
A: Absolutely! It’s a meal prep superstar. You have two awesome options: 1) Assemble & Refrigerate: Complete steps 1-5 (cook the filling, put it in the dish, add cheese). Cover tightly and refrigerate for up to 24 hours. Bake straight from the fridge, adding 5-10 extra minutes. 2) Freeze for Later: Assemble completely (with cheese). Wrap the UNBAKED dish tightly in plastic wrap and foil. Freeze for up to 3 months. Thaw overnight in the fridge, then bake as directed (might need a few extra minutes). You can also freeze individual baked portions! - Q: Is cauliflower rice necessary? I’m not a fan.
A: Not at all! The cauliflower rice acts as a filler to absorb flavor and add texture without carbs. If you want to skip it, you can! The casserole will be saucier and meatier. You could try adding an extra cup of finely chopped veggies (like more peppers or mushrooms) or even 1/2 cup of crushed pork rinds (they soften and thicken) to the simmering step. - Q: My cheese browned too fast/burned! Help!
A: Ovens can be sneaky! If the cheese is getting too dark before the filling is bubbly: 1) Tent the dish loosely with foil for the last 10 minutes of baking. 2) Move the dish to a lower rack in your oven next time. 3) Check your oven temp with a thermometer – it might run hot! 4) Use full-fat cheese; low-fat cheeses burn more easily.
Nutritional Info (Per Serving)
Approximate values based on specific ingredients used. Always check your labels for accuracy!
- Calories: ~420
- Protein: ~28g
- Net Carbs: ~7g
- Fat: ~30g
Prep Time: 8 min | Cook Time: 30 min | Total Time: ~38 min | Serves: 6

Leave a Reply